In This Article
Anyone who’s ever played hockey knows the struggle. You get home from practice, your gear is soaked through with sweat, and you’re faced with that age-old question: where do I put all this wet, smelly equipment? If you’re like most Canadians, it probably ends up in a crumpled heap in the garage or stuffed into a bag where bacteria can throw a party.
Here’s the thing – that innocent pile of gear isn’t just an organizational nightmare. Research from Canada’s Public Health Agency shows that unwashed sports equipment can harbour dangerous bacteria like MRSA (Methicillin-resistant Staphylococcus aureus), which causes skin infections that can become serious if left untreated. Hockey equipment, in particular, has been found to contain 100 times more bacteria than gear used in other sports.
That’s where a quality hockey equipment storage rack becomes essential. Not just for keeping your garage tidy, but for protecting your health and extending the life of expensive gear that can cost thousands of dollars to replace. In this comprehensive guide, I’ll walk you through the best hockey equipment storage rack options available in Canada for 2026, from budget-friendly basics to premium ventilation systems that’ll make your gear smell like it just came off the store shelf.
Whether you’re organizing a single player’s gear or managing equipment for an entire team, you’ll find practical solutions that work with Canadian homes, garages, and our unique climate challenges.
Quick Comparison Table
| Product | Type | Price (CAD) | Best For | Rating |
|---|---|---|---|---|
| Hockey Canada Dry Rack | Standing Tree | $49.99-$79.99 | Budget-conscious families | 4.5/5 |
| Winnwell Deluxe Drying Rack | Premium Tree | $99.99-$109.99 | Serious players | 4.7/5 |
| Wet Gear Locker Sport Dryer | Heavy-Duty Tree | $89.99+ | Multi-sport families | 4.6/5 |
| Mastercraft MOD Stick Holder | Wall Mount | $19.99-$29.99 | Stick organization | 4.3/5 |
| Rocket Sport Heated Dryer | Portable w/Heat | $90-$320 | Tournament players | 4.8/5 |
| TronX Metal Dryer Rack | Standing Tree | ~$68 | Value seekers | 4.4/5 |
| Stick Check Rack | Wall Mount | $45-$65 | Team use | 4.5/5 |
✨ Don’t Miss These Exclusive Deals!
🔍 Take your hockey equipment storage to the next level with these carefully selected products available in Canada. Click on any highlighted item to check current pricing and availability on Amazon.ca and Canadian retailers. These tools will help you create authentic organization your family will love!
Top 7 Hockey Equipment Storage Rack: Expert Analysis
1. Hockey Canada Dry Rack – Best Budget Option
The Hockey Canada Dry Rack is the go-to choice for Canadian families who want reliable equipment storage without breaking the bank. This officially licensed rack stands 55 inches tall and features sturdy steel construction that can handle everything from youth to adult gear.
Key Specifications:
- Material: Powder-coated steel frame
- Height: 55 inches (140 cm)
- Assembly: Tool-free snap-together design
Price Range: $49.99-$79.99 CAD (varies by retailer)
Canadian Availability: Widely available at Cyclone Taylor Sports, Team Town Sports, and local hockey shops across Canada.
Customer Feedback: Canadian buyers consistently praise this rack’s simplicity and durability. Parents note that it assembles in under 10 minutes and fits nicely in standard Canadian garage spaces without taking up excessive room. The most common critique is that it doesn’t include clips for smaller accessories, though many users solve this with inexpensive S-hooks from hardware stores.
✅ Pros:
- No tools required for assembly
- Officially licensed by Hockey Canada
- Fits snugly in tight garage spaces
❌ Cons:
- Limited accessory hanging options
- Basic design without advanced features
This rack works particularly well for families with one or two players who need straightforward, effective gear drying.
2. Winnwell Deluxe Equipment Drying Rack – Premium Choice
When you’re ready to invest in quality, the Winnwell Deluxe Equipment Drying Rack delivers professional-grade performance. This is the rack you’ll see in Canadian hockey academies and serious players’ homes from Vancouver to Halifax.
Key Specifications:
- Two-post system for maximum stability
- 10 heavy-duty clips included
- Multiple horizontal bars for equipment placement
Price Range: $99.99-$109.99 CAD
Canadian Availability: Available at Canadian Tire, HockeyMonkey.ca, and specialty hockey retailers. Free shipping on orders over $99 at most retailers.
Customer Feedback: Canadian reviewers highlight this rack’s exceptional stability – it doesn’t tip even when loaded with wet goalie equipment. Several parents mention that it easily handles two complete sets of gear, making it perfect for siblings. The powder coating resists rust even in humid Canadian garages.
✅ Pros:
- Professional-grade stability
- Comes with 10 versatile clips
- Handles two complete gear sets
❌ Cons:
- Higher price point
- Heavier to move (14 lbs)
This is the rack I’d recommend for families serious about hockey who want equipment that’ll last through multiple seasons and players.
3. Wet Gear Locker Sport Dryer – Best for Multi-Sport Families
The Wet Gear Locker Sport Dryer goes beyond hockey. If your family is into ringette, lacrosse, football, or winter sports, this versatile rack handles it all with cold-rolled steel construction that can support up to 220 lbs.
Key Specifications:
- Dimensions: 22″ × 36″ × 74″ (56 × 91 × 188 cm)
- Cold-rolled steel with powder coating
- Two-post design for enhanced stability
Price Range: $89.99-$149.99 CAD
Canadian Availability: Stocked at Costco Canada, United Sport (Edmonton), and online with free shipping on orders $99+.
Customer Feedback: Canadian buyers love the multi-sport functionality. One Calgary family reported using it year-round for hockey in winter and lacrosse in summer. The wide base provides excellent stability on uneven garage floors, which is a common issue in older Canadian homes.
✅ Pros:
- Multi-sport versatility
- Extra-wide base for stability
- Premium construction quality
❌ Cons:
- Larger footprint requires more space
- Assembly takes 15-20 minutes
Perfect for active Canadian families who need one rack to handle all their sports equipment throughout the year.
4. Mastercraft MOD Hockey Stick Holder – Best Wall Mount Solution
The Mastercraft MOD Hockey Stick Holder solves the eternal problem of hockey sticks scattered across the garage. This reinforced nylon wall mount holds up to 5 sticks vertically and integrates seamlessly with Mastercraft’s MOD garage organization system.
Key Specifications:
- Capacity: 5 hockey sticks (youth to adult)
- Material: Reinforced nylon construction
- Mounting: Compatible with studs or finished walls
Price Range: $19.99-$29.99 CAD
Canadian Availability: Exclusive to Canadian Tire stores nationwide with 1-year warranty.
Customer Feedback: Canadian homeowners appreciate the push-in/pull-out design that makes grabbing sticks effortless before heading to the rink. Many users combine it with other MOD accessories to create a complete garage sports zone. Note that installation on drywall requires the included anchors, but stud mounting provides superior strength.
✅ Pros:
- Space-saving vertical storage
- Part of larger MOD system
- Easy push-pull access
❌ Cons:
- Sticks only (no full equipment storage)
- Requires wall mounting
Ideal for Canadian garages where floor space is at a premium but you have available wall real estate.
5. Rocket Sport Heated Dryer – Best for Serious Players
The Rocket Sport Heated Dryer represents the ultimate solution for players who need bone-dry equipment fast. Used by NHL, OHL, and NCAA teams, this portable heated system dries complete gear sets in 30-60 minutes.
Key Specifications:
- Heating system with adjustable temperature
- Portable design with carrying case
- Dries youth equipment in 30 min, senior in 60 min
Price Range: $90-$320 CAD (depending on model)
Canadian Availability: Ships free across Canada from rocketsport.com. Some models available at select Pure Hockey locations.
Customer Feedback: Tournament players rave about this system. One Ontario parent described taking it to a five-game weekend tournament where everyone else complained about wet gear while their child played in warm, dry equipment every game. Users recommend adding dryer sheets to keep gear smelling fresh. The lightweight zipper can be finicky initially but improves with use.
✅ Pros:
- Extremely fast drying (30-60 minutes)
- Portable for tournaments
- Eliminates odours effectively
❌ Cons:
- Higher investment
- Requires electrical outlet
This is the choice for competitive players who can’t afford to step on the ice with damp equipment.
6. TronX Metal Hockey Equipment Dryer Rack – Best Value Pick
The TronX Metal Hockey Equipment Dryer Rack delivers solid performance at an accessible price point. With its efficient two-post design and included clips, it punches well above its weight class.
Key Specifications:
- Weight: 14 lbs for stability
- Includes 10 heavy-duty clips
- All-metal powder-coated construction
Price Range: Approximately $68 CAD (sale price from $95 USD)
Canadian Availability: Available through HockeyTron.com with shipping to Canada. Check for Canadian dollar conversion and duties.
Customer Feedback: Value-conscious Canadian buyers highlight the impressive build quality for the price. The rack assembles without tools and holds a complete player’s gear plus goalie equipment. Some users note shipping times from the US can take 2-3 weeks, so plan ahead if ordering for the start of season.
✅ Pros:
- Excellent value for money
- No-tool assembly
- Generous clip supply
❌ Cons:
- Ships from US (potential duties)
- Longer delivery times
Great option for families who want quality without premium pricing and don’t mind waiting for delivery.
7. Stick Check Rack – Best for Team Use
The Stick Check Rack is engineered specifically for team dressing rooms and hockey academies. Proudly made in Canada, it holds up to nine hockey sticks and is designed to handle the demanding environment of busy arenas.
Key Specifications:
- Capacity: 9 hockey sticks
- Durable lightweight material
- Wall-mounted design
Price Range: $45-$65 CAD (volume discounts available)
Canadian Availability: Direct from stickcheck.com with shipping across Canada. Used in arenas nationwide.
Customer Feedback: Arena managers and coaches appreciate the efficient space utilization and durability. The clips are designed for quick stick retrieval during game situations. Several minor hockey associations report these racks lasting 5+ seasons with heavy use. Replacement clips are available if needed.
✅ Pros:
- Purpose-built for team use
- Made in Canada
- Proven arena durability
❌ Cons:
- Requires professional installation
- Designed for sticks only
Perfect for coaches, team managers, or families setting up a home training area that emulates the rink experience.
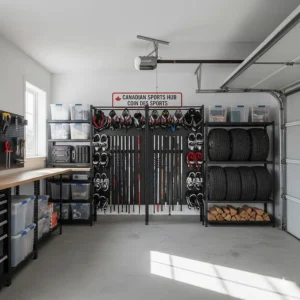
Understanding Hockey Equipment Storage Rack Systems
A hockey equipment storage rack isn’t just a place to dump your gear. It’s a critical piece of equipment management that serves three essential functions: preventing bacterial growth, extending equipment lifespan, and maintaining organization.
The Science Behind Proper Equipment Drying
When you finish a game or practice, your equipment is saturated with sweat and moisture. If you immediately seal this in a hockey bag, you’re creating what microbiologists call an “optimal growth medium” for bacteria. The warm, damp, dark environment allows dangerous pathogens to multiply rapidly.
According to research highlighted by Canadian equipment cleaning specialists, bacteria populations can double every 20 minutes under ideal conditions. Within just a few hours, a single bacterium can become millions. This isn’t just about smell – it’s a legitimate health concern that Canadian parents need to take seriously.
Proper air circulation through a hockey equipment storage rack disrupts this bacterial party. By spreading your gear out and allowing air to flow around each piece, you create an environment where bacteria struggle to survive. Most harmful bacteria thrive in moisture and die off when exposed to dry conditions.
Climate Considerations for Canadian Storage
Canada’s diverse climate zones present unique challenges for equipment storage. In coastal British Columbia, high humidity means gear takes longer to dry and mould becomes a concern. Prairie provinces deal with extremely dry winter air that can crack leather components. Ontario and Quebec experience humid summers that accelerate bacterial growth.
The key is understanding your local climate and choosing a storage solution that works with your environment. In humid regions, consider racks with maximum air exposure or even heated drying systems. In dry climates, focus on preventing equipment from becoming brittle while still allowing adequate ventilation.
Many Canadian garages aren’t heated, which actually helps with equipment drying in winter – cold air holds less moisture. However, extremely cold temperatures can damage certain equipment components. The ideal storage temperature range is 10-20°C (50-68°F) with good air circulation.
Types of Storage Systems Available
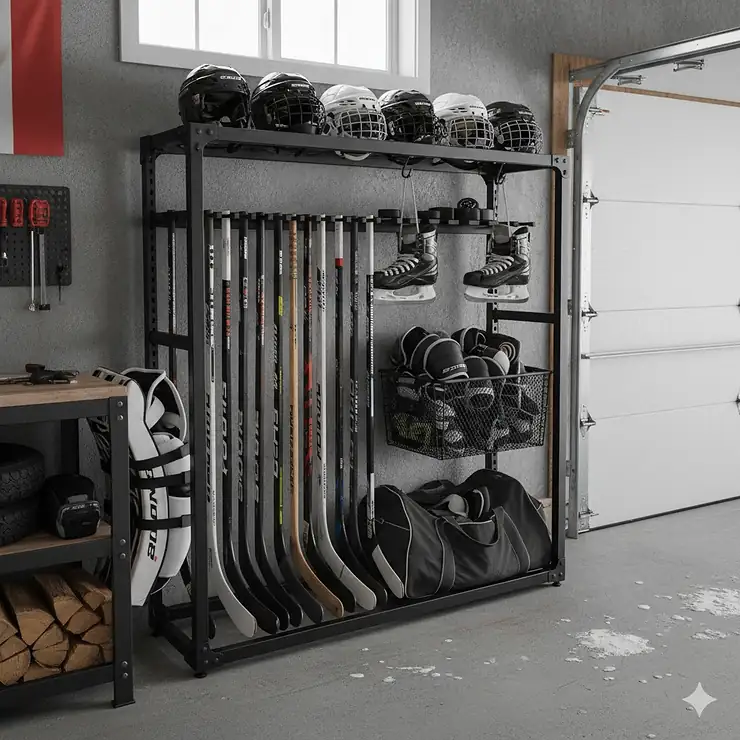
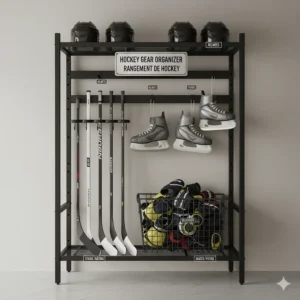
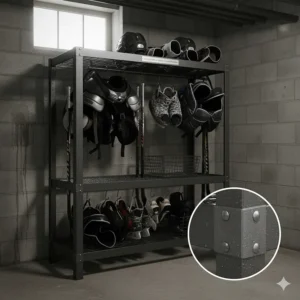
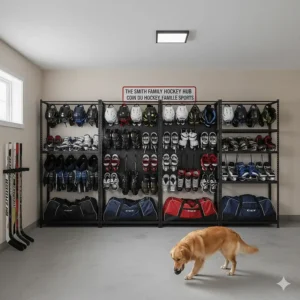
Standing Tree Racks: These freestanding units resemble a coat rack and are the most popular choice for Canadian families. They’re portable, require no installation, and can hold complete gear sets. The two-post design provides stability, while multiple bars allow you to hang everything from helmets to pants.
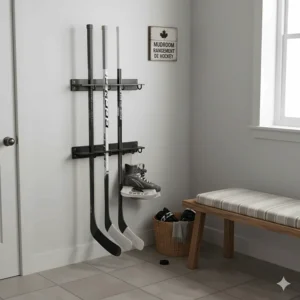
Wall-Mounted Systems: Perfect for smaller garages where floor space is limited. These systems maximize vertical space and keep equipment off the ground. They work exceptionally well for stick storage and can be combined with standing racks for complete gear management.
Heated Drying Systems: The premium option, these enclosed or semi-enclosed systems use gentle heat and airflow to dry equipment in 30-60 minutes. While more expensive, they’re worth considering for competitive players who practice multiple times weekly.
Portable Hanging Racks: Over-the-door or portable strap systems work well for apartments or situations where permanent installation isn’t possible. They’re budget-friendly and work surprisingly well for youth equipment.
How to Choose the Right Hockey Equipment Storage Rack for Canada
Selecting the perfect hockey equipment storage rack involves balancing several factors unique to Canadian hockey families. Here’s my systematic approach to making the right choice.
Step 1: Assess Your Space Constraints
Start by measuring your available storage area. Most Canadian garages are approximately 20 feet deep, but width varies significantly. Measure both floor space and vertical clearance – some taller racks may interfere with garage door openers or ceiling-mounted storage.
Consider door swing clearances and car parking needs. The ideal setup lets you park your vehicle comfortably while still accessing equipment easily. Wall-mounted solutions work brilliantly in narrow garages where every square foot of floor space matters.
Step 2: Count Your Equipment Load
How many players’ worth of gear do you need to store? A single youth player requires less space than an adult goalie. Make an honest inventory of all equipment: helmets, shoulder pads, elbow pads, gloves, pants, shin guards, skates, and sticks.
Don’t forget accessories like practice jerseys, neck guards, mouthguards, and tape. A rack that seems adequate for basic gear may feel cramped once you account for everything. I recommend choosing a rack that handles 25-30% more than your current needs to allow for growing players and additional equipment.
Step 3: Evaluate Your Budget Range
Hockey equipment storage rack prices in Canada range from about $20 for basic wall mounts to $300+ for premium heated systems. Determine your budget but remember this is an investment in equipment preservation. A $100 rack that extends the life of $1,500 worth of gear by even one extra season pays for itself quickly.
Consider the total cost of ownership. Some racks require additional accessories like clips or hooks. Factor in shipping costs for products not available locally – cross-border shipping can add 20-30% to the price with duties and exchange rates.
Step 4: Match Features to Your Needs
Different families have different priorities. Tournament players who practice 4-5 times weekly need faster drying solutions than recreational players. Goaltenders require racks with extra capacity and specialized hanging points for bulky equipment.
Multi-sport families should prioritize versatility – racks that handle hockey in winter, lacrosse in spring, and football in fall provide better value than single-sport solutions. Climate control features matter more in humid regions than arid ones.
Step 5: Consider Long-Term Flexibility
Kids grow, and their hockey careers evolve. A rack suitable for an eight-year-old Timbit player may not accommodate a teenage competitive player. Look for adjustable systems that grow with your player or can be expanded with additional components.
Some systems, like Mastercraft’s MOD series, integrate with broader garage organization solutions. Starting with a basic rack now doesn’t mean you can’t expand into a complete sports storage system later.
Step 6: Check Canadian Availability and Warranty
Prioritize products readily available in Canada to avoid customs headaches and lengthy shipping delays. Canadian retailers typically offer better warranty support and easier returns than international sellers.
Verify warranty coverage before purchasing. Most quality racks include at least a one-year warranty, with some Canadian Tire products offering satisfaction guarantees. Keep receipts and warranty documentation – rust-through or structural failures should be covered even after regular use.
Step 7: Read Canadian Customer Reviews
Pay special attention to reviews from other Canadian buyers. They’ll mention issues specific to our market like whether the rack handles wet winter equipment, fits in standard Canadian garage dimensions, or holds up to our temperature extremes.
Look for patterns in negative reviews. One complaint about assembly difficulty might be an outlier, but multiple mentions suggest a genuine issue. Similarly, consistent praise for specific features indicates reliable performance you can trust.
Installation and Setup Guide
Getting your hockey equipment storage rack properly installed sets you up for years of convenient use. Here’s how to do it right, whether you’re mounting to walls or positioning a freestanding unit.
Preparing Your Garage Space
Clear the installation area completely. You’ll want adequate working room and good lighting to ensure proper placement. Clean the floor or wall surface where the rack will go – dirt and debris can interfere with stability or mounting hardware.
Locate wall studs if you’re installing wall-mounted systems. In Canadian construction, studs are typically spaced 16 inches apart, though older homes may use 24-inch spacing. A quality stud finder costs $20-40 and prevents the frustration of failed installations.
Wall-Mounted Installation Best Practices
Mark your mounting points carefully using a level. Uneven installations cause equipment to slide or fall. For drywall installations without stud backing, use the heavy-duty anchors included with quality racks – they’re rated for the weight specifications.
Drill pilot holes slightly smaller than your screws to prevent splitting in wooden studs. Tighten mounting hardware firmly but avoid over-tightening, which can strip threads or crack mounting brackets. Test the installation by pulling firmly before loading equipment.
Freestanding Rack Positioning
Position freestanding racks on level, solid surfaces. Concrete garage floors work perfectly, but be cautious on painted surfaces where equipment might slide. Some families add rubber furniture pads underneath to protect flooring and prevent movement.
Leave adequate clearance on all sides for air circulation. Equipment touching walls won’t dry properly and may transfer moisture to building materials, potentially causing mould issues. Aim for at least 6 inches of clearance around the rack.
Optimizing Airflow Patterns
Position racks where natural air currents will enhance drying. Near garage doors or windows works well, though avoid direct exposure to weather. Some Canadian families use small fans to boost air circulation, particularly in humid summer months.
Consider seasonal adjustments. Winter air in Canadian garages is naturally dry, so equipment dries quickly. Summer humidity may require supplemental ventilation or even dehumidifiers in particularly muggy regions.
Safety Considerations
Ensure racks won’t tip if children grab or pull on equipment. The two-post designs popular in Canada offer excellent stability, but always test before regular use. Avoid overloading – a rack rated for one complete gear set shouldn’t hold two adult sets plus goalie equipment.
Keep electrical cords from heated drying systems away from vehicle paths and water sources. Use GFCI-protected outlets for any powered equipment, especially in damp garage environments.
Maintenance and Care for Your Storage System
A well-maintained hockey equipment storage rack will serve your family for years. Here’s how to keep your investment in top condition through Canadian seasons and heavy use.
Regular Cleaning Protocols
Wipe down your rack monthly with a damp cloth to remove dust and dried sweat residue. For powder-coated metal racks, mild soap and water work perfectly. Avoid abrasive cleaners that might scratch the protective coating and expose metal to rust.
Pay special attention to clips and hanging points where equipment makes repeated contact. These areas accumulate sweat salts that can become corrosive over time. A quick wipe after each season prevents buildup.
Preventing Rust in Canadian Climates
Coastal and humid regions require extra vigilance against rust. Inspect metal components annually for any signs of coating damage. Touch up small chips or scratches immediately with matching paint or clear sealant to prevent rust from spreading.
In winter, road salt tracked into garages accelerates corrosion. Place mats near entrance doors and consider washing down the garage floor area around your rack periodically during winter months.
Checking Structural Integrity
Inspect mounting hardware on wall-mounted systems every few months. Vibrations from garage door operations or temperature cycling can gradually loosen screws. A quick tightening check takes minutes and prevents failures.
For freestanding racks, verify that no joints have worked loose. The constant weight of wet equipment can stress connections over time. Most quality racks use metal-to-metal connections that rarely fail, but plastic components may crack with age.
Replacing Worn Components
Clips and hooks experience the most wear since equipment gets hung and removed repeatedly. Most Canadian retailers sell replacement clips, typically in packs of 6-10 for $10-20. Replace any that show cracks or have lost their spring tension.
If your rack uses fabric straps or nylon components, check for fraying or UV damage. Garage windows let in sunlight that can degrade synthetic materials over years of exposure.
Seasonal Adjustments
Reconfigure your rack for off-season storage if needed. Some families use the same rack for hockey gear in winter and summer sports equipment when hockey season ends. Clean thoroughly between sports to prevent cross-contamination of bacteria or odours.
Consider covering stored equipment during summer months to protect from dust. Lightweight breathable covers allow air circulation while keeping gear clean. Never use plastic covers that trap moisture and encourage mould growth.
Common Problems and Solutions
Even the best hockey equipment storage rack can present challenges. Here’s how to troubleshoot the most common issues Canadian families encounter.
Equipment Still Smells After Drying
If your gear still reeks despite proper drying, bacteria have colonized deep into foam padding. This requires more than just air drying. Professional cleaning services using ozone technology (available at many Canadian hockey shops for $35-50) kill bacteria at the source.
For ongoing odour control, spray equipment with antimicrobial solutions immediately after removing from the bag. Products like Sport Clenz or Clear Gear (available at Canadian retailers) break the bacterial cycle before it starts. Let the spray dry completely on your rack before bagging gear.
Rack Tips or Feels Unstable
Instability usually stems from uneven loading or floor issues. Ensure heavier items like shoulder pads and pants are placed on lower hooks for a lower centre of gravity. Distribute weight evenly between both sides of two-post racks.
Check that your garage floor is level where the rack stands. Older Canadian homes may have settling that creates slight slopes. Adjustable feet (available at hardware stores) can compensate for minor unevenness.
Limited Space for All Equipment
If you’ve outgrown your rack, resist the temptation to overload it. Instead, add supplemental storage like wall-mounted stick holders or helmet shelves. Separating sticks from the main rack actually improves air circulation around other equipment.
Consider rotating equipment if you have backup sets. Keep your most-used gear on the primary rack and store backup or seasonal equipment elsewhere. This prevents overcrowding while ensuring fresh gear is always ready.
Rust Appearing on Metal Components
Surface rust on powder-coated racks indicates coating damage. Sand the affected area lightly with fine-grit sandpaper, wipe clean, and apply rust-inhibiting spray paint. Most Canadian hardware stores carry spray paints formulated for humid environments.
For stainless steel components, rust shouldn’t occur. If it does, you’re likely seeing iron contamination from other sources. Clean with a stainless steel cleaner and the discolouration should disappear.
Equipment Not Drying Completely
Incomplete drying usually means insufficient air circulation. Ensure equipment isn’t bunched together or touching walls. In humid summer months, supplemental ventilation helps tremendously. A basic 12-inch fan (running cost: a few cents per day) makes a dramatic difference.
For persistent moisture issues, consider upgrading to a heated drying system or at least positioning your rack near a dehumidifier. Chronic dampness not only allows bacteria to thrive but also degrades equipment padding and promotes mould.
Wall Mount Pulling Loose
This indicates either improper installation or overloading. If installed in drywall without stud backing, you may have exceeded anchor weight ratings. Reinstall into wall studs or upgrade to heavy-duty toggle bolts rated for at least 50 pounds per anchor.
For stud-mounted systems that loosen, the wood may have dried and shrunk. This is common in new Canadian construction during the first few years. Remove the screws, fill holes with toothpicks and wood glue, let dry, then reinstall with slightly longer screws.
Garage Door Interference
Racks positioned too close to garage door tracks can create clearance issues. Measure your door’s full travel path when selecting placement. Most overhead garage doors require about 12 inches of clearance on each side for the track hardware.
If space is truly tight, wall-mounted systems on the perpendicular wall (opposite the garage door) often work better than freestanding racks that encroach on the door’s footprint.
Beyond Basic Storage: Advanced Organization Tips
Once you’ve mastered the fundamentals of hockey equipment storage rack use, these advanced techniques will transform your setup from functional to exceptional.
Creating a Complete Hockey Zone
Dedicate a specific garage area as your hockey command center. Beyond the main drying rack, include a stick rack, a bench for putting on skates, and a small shelf for accessories like tape, wax, and laces. This centralized approach streamlines your hockey routine and keeps everything accessible.
Add a whiteboard or corkboard nearby for tracking practice schedules, game times, and equipment maintenance reminders. Some families even install a small pegboard for tools needed for skate sharpening and equipment adjustments.
Implementing a Rotation System
Competitive players often maintain two sets of equipment – one in use, one drying. This rotation ensures you always step onto the ice in completely dry gear. While expensive upfront, the health benefits and equipment longevity make it worthwhile for serious players.
For families with multiple players, colour-code or label equipment to prevent mix-ups. Cheap luggage tags or coloured tape make identification instant, eliminating the morning scramble to find the right gear.
Seasonal Equipment Transition
When hockey season ends, thoroughly clean all equipment before long-term storage. Many Canadian hockey shops offer off-season equipment cleaning services (typically $40-60 for a complete set). Properly cleaned gear stored in a cool, dry location emerges next season ready for use.
Repurpose your hockey equipment storage rack for summer sports. Lacrosse, baseball, and other gear benefit from the same drying and organization principles. This year-round utility maximizes your investment.
Integrating Technology
Some Canadian families are adding simple innovations to their equipment storage. Motion-sensor LED strips (available at hardware stores for under $30) automatically illuminate your hockey zone when you enter, making early-morning practices more convenient.
Small battery-powered moisture meters can monitor drying effectiveness. Place one among your equipment and check readings before bagging gear – most bacteria thrive above 60% humidity, so aim for readings below that threshold.
Teaching Kids Equipment Responsibility
Use your hockey equipment storage rack as a teaching tool for responsibility. Kids as young as six can learn to hang their own equipment properly. This life skill builds independence and ensures gear actually makes it onto the rack instead of staying in the bag.
Create a simple checklist visible near the rack showing proper equipment placement. Visual learners benefit from photos or diagrams showing where each piece goes. Consistent routines established young become lifelong habits.
Hockey Stick Holder Wall Mount: Maximizing Vertical Space
Hockey sticks present unique storage challenges. They’re long, awkward to stack, and damage easily if stored improperly. A dedicated hockey stick holder wall mount solves these problems while freeing valuable floor space.
Why Separate Stick Storage Matters
Sticks leaning against walls eventually develop warped shafts, especially composite models sensitive to pressure points. Horizontal storage on your main equipment rack works but consumes space needed for other gear. Wall-mounted stick holders provide proper support while utilizing otherwise wasted vertical space.
Canadian garages typically have 8-10 foot ceilings, offering ample vertical real estate. A stick holder positioned 6-7 feet high keeps sticks accessible for adults while safely above the chaos of floor-level garage activities.
Installation Considerations
Mount stick holders on walls perpendicular to garage doors to avoid interfering with door operation. Ensure they’re positioned where vehicle doors won’t strike them when opened. A good rule is at least 18 inches from any door swing path.
Choose installation height based on your family’s reach. For families with young players, consider positioning a youth stick holder lower (4-5 feet) with an adult holder higher. This teaches organization while accommodating different sizes.
Best Stick Holder Options for Canadians
The Mastercraft MOD Hockey Stick Holder, exclusive to Canadian Tire, offers exceptional value at $19.99-$29.99. Its push-in/pull-out design makes stick access effortless, and it integrates with other MOD components if you expand your garage organization system.
For display purposes, the SinBinShop.com Hockey Stick Display Holder (available on Amazon.ca) features aircraft-grade aluminum construction with felt padding that protects graphics and autographs. It’s perfect for showcasing signed sticks or special memorabilia.
The Stick Check Rack, made in Canada, is the professional choice. Used in arenas nationwide, it holds nine sticks and is engineered for high-traffic team environments. While pricier at $45-$65, it’s virtually indestructible.
DIY Stick Storage Solutions
Handy Canadians can build simple stick holders using 2-inch PVC pipe segments mounted to a board. Cut 3-inch sections of pipe, mount them vertically on a 1×6 board spaced about 3 inches apart, and secure the board to wall studs. Total cost: under $20.
For a rustic look, use reclaimed barn wood with holes drilled at an upward angle. The holes catch stick blades while shafts lean against the wall. This approach adds character to garage spaces while functioning perfectly.
Hockey Bag Storage Solutions: Containing the Chaos
While your hockey equipment storage rack handles individual pieces, the hockey bag itself needs storage consideration. Empty bags can harbour residual moisture and bacteria if not properly managed.
The Problem with Bag Storage
Most players make a critical mistake: they leave equipment in bags between uses. This traps moisture and creates ideal bacterial conditions. The solution is simple but requires discipline – always empty your bag completely and store it separately from equipment.
Empty bags should be turned inside out and hung to air. This exposes interior surfaces to airflow and prevents moisture accumulation. Many Canadian families hang bags on garage wall hooks positioned specifically for this purpose.
Creating an Efficient Bag Station
Dedicate a wall hook or pegboard section for bag storage near your main hockey equipment storage rack. This proximity makes the equipment-to-bag transfer effortless on game days while keeping bags separate during drying periods.
Consider having two bags for competitive players who practice frequently. While one bag airs out after use, the other is ready for the next session. This rotation prevents odour buildup and extends bag lifespan significantly.
Bag Cleaning and Maintenance
Wash hockey bags 2-3 times per season minimum. Most modern bags are machine washable on gentle cycles with cold water. Use sport-specific detergents that target bacteria and odours. Air dry completely – never use a dryer, which can damage waterproof coatings.
Between washes, spray bag interiors with antimicrobial solutions. Many Canadian players keep a spray bottle of diluted vinegar (1:1 with water) in their garage for quick bag freshening. It’s inexpensive, effective, and safe for all materials.
Goalie Bag Considerations
Goalie equipment bags are massive compared to player bags and require special storage considerations. Wall-mounted systems rarely work due to weight. Instead, designate floor space in your garage specifically for the goalie bag, preferably on a raised platform or mat to prevent moisture transfer from concrete floors.
Some Canadian goalie families use large plastic storage bins with ventilation holes as off-season bag storage. This protects bags from dust and pests while maintaining airflow.
Hockey Helmet Organizer Rack: Protecting Your Most Important Equipment
Helmets require special storage attention. They’re crucial for safety, expensive to replace ($50-$300 for quality models), and easily damaged by improper storage. A dedicated hockey helmet organizer rack ensures this vital equipment stays in perfect condition.
Why Helmets Need Special Care
Helmet foam liners compress if stored under weight or in awkward positions. This compression reduces safety effectiveness and can void certifications. Hanging helmets properly maintains liner integrity while allowing complete drying after each use.
The interior of helmets becomes saturated with sweat during play. This moisture, trapped against foam padding, creates perfect conditions for bacterial growth. Proper air circulation through a helmet organizer rack prevents this while eliminating odours.
Helmet Storage Best Practices
Always store helmets upside-down or hanging from cage attachments, never resting on the crown. This prevents compression of critical padding areas. Most hockey equipment storage rack designs include specific helmet hanging points, but dedicated helmet racks provide extra capacity.
Remove and wash helmet padding monthly during the season. Most modern helmets feature removable liners that machine wash easily. While the liner washes, wipe down the shell with antimicrobial solution. This simple maintenance dramatically reduces odour and bacterial loads.
Helmet Organizer Options
Many Canadian families use individual wall hooks spaced appropriately for each player’s helmet. Simple J-hooks from hardware stores (under $5 each) work perfectly. Mount them at heights where kids can reach to hang their own helmets, building responsibility.
For team environments, consider multi-helmet racks designed for locker rooms. These systems hold 10-20 helmets in minimal space and are available through hockey equipment suppliers across Canada.
Cage and Visor Care
Don’t neglect cages and visors during storage. Rinse cages with water after every use to remove sweat and saliva. Once weekly, soak in warm soapy water and scrub with an old toothbrush to remove buildup from cage intersections.
Visors require gentle care – scratches impair vision and can’t be repaired. Store helmets where visors won’t contact other equipment. Some families keep microfiber cloths nearby specifically for wiping visors before storage, preventing dried residue that later becomes scratches.
Hockey Equipment Drying Tower: Premium Solutions
For families serious about equipment care and willing to invest in premium solutions, hockey equipment drying tower systems represent the pinnacle of gear management technology. These specialized systems dry equipment faster and more thoroughly than basic racks.
How Drying Towers Work
Heated drying towers use gentle airflow and controlled temperature (typically 35-45°C) to remove moisture from equipment in 30-60 minutes. The enclosed or semi-enclosed design directs airflow precisely where needed, dramatically outperforming passive air drying.
The science is straightforward – warm air holds more moisture than cold air. By gently heating the air around your equipment, these systems accelerate evaporation while preventing the high heat that could damage materials. It’s the same principle commercial laundries use, adapted for sports equipment.
When Drying Towers Make Sense
Competitive players practicing 4-5 times weekly face constant gear dampness. Traditional air drying rarely completes between sessions, meaning you’re putting damp equipment back on for the next practice. This increases bacterial loads and discomfort.
Families with multiple players face scheduling challenges. If two kids practice on the same day, traditional drying can’t turn around the second player’s equipment fast enough. Heated drying towers solve this timing problem completely.
Tournament players experience the worst equipment conditions – multiple games in short periods with no drying time. A portable drying tower means fresh, dry equipment for every game, providing comfort and competitive advantages.
Top Drying Tower Options for Canada
The Rocket Sport Heated Dryer dominates the Canadian market for good reason. Priced from $90-$320 CAD depending on model, it delivers professional-grade performance in a portable package. Youth equipment dries in 30 minutes, senior in 60 minutes.
Canadian customers consistently mention the carrying case as a major advantage. Tournament travel becomes easier when your drying system fits in the trunk alongside equipment bags. The lightweight design (under 10 pounds for most models) makes transport effortless.
The Odor Crusher Dry-Clean Flex Sports Closet, available at HockeyMonkey.ca for $549.99, represents the premium end of the market. This full-size cabinet provides space for multiple complete gear sets and includes ozone sanitization technology that kills 99.9% of bacteria.
Operating Costs and Efficiency
Heated drying towers consume 300-500 watts during operation. At typical Canadian electricity rates ($0.12-$0.15 per kWh), an hour of drying costs about $0.05-$0.08. For families running the system 4-5 times weekly, annual electricity costs total about $15-25 – negligible compared to the benefits.
The energy efficiency dramatically improves in winter months. Canadian garage temperatures drop significantly, making passive air drying slower and less effective. Heated systems maintain consistent performance year-round regardless of ambient conditions.
Maintenance Requirements
Heated drying systems require minimal maintenance. Clean any intake filters monthly to maintain airflow efficiency. Check electrical cords for damage periodically, especially if the system travels to tournaments frequently.
The heating elements in quality systems typically last 5-10 years with regular use. Most Canadian retailers offer extended warranties that cover component failures, though these are rare with reputable brands.
Sports Gear Ventilation System: Advanced Air Management
While traditional hockey equipment storage rack designs rely on passive air drying, advanced sports gear ventilation system technology actively manages airflow for superior results. Understanding these systems helps you maximize drying efficiency even with basic equipment.
Principles of Effective Ventilation
Moisture removal requires three elements: air movement, temperature, and humidity control. Stagnant air becomes saturated with moisture quickly and stops absorbing more from equipment. Moving air constantly replaces saturated air with fresh dry air, maintaining moisture transfer.
Temperature affects air’s moisture-holding capacity. Every 10°C increase roughly doubles the amount of water air can hold. This is why equipment dries faster on warm days – not because heat evaporates water directly, but because warm air absorbs more moisture.
Humidity presents the final piece. On humid days, even moving air is already moisture-saturated and can’t absorb much from equipment. This is why coastal British Columbia residents struggle with equipment drying during rainy seasons while prairie players enjoy rapid drying in low-humidity climates.
Passive Ventilation Strategies
Position your hockey equipment storage rack where natural air currents enhance drying. Garage doors create significant airflow when opened, so placing racks near doors (but not directly in the opening) takes advantage of this natural ventilation.
Window placement matters in Canadian garages. Cross-ventilation occurs when windows or vents on opposite walls allow air to flow through. Opening both garage door and a rear window creates excellent airflow even without mechanical assistance.
Many Canadian families open garage doors for 15-30 minutes when they return home from hockey to flush out moisture-saturated air. This simple habit, combined with a quality storage rack, provides excellent results without additional equipment investment.
Active Ventilation Solutions
Inexpensive 12-inch fans make dramatic differences in drying speed. Position a basic shop fan ($25-40 at Canadian hardware stores) to blow across your equipment rack. This airflow accelerates drying by 2-3x compared to still air.
For permanent installations, some Canadian homeowners install garage exhaust fans controlled by timers or humidity sensors. These systems automatically activate when humidity rises above set thresholds, maintaining optimal drying conditions without manual intervention.
Dehumidifiers represent another active solution, particularly valuable in humid Canadian regions. A basic 30-pint dehumidifier ($200-300) can drop garage humidity from 70% to 40%, dramatically improving equipment drying even without additional airflow.
Balancing Airflow and Energy Costs
While fans and dehumidifiers improve drying, they consume electricity. A basic fan costs about $0.02 per hour to operate, making it extremely economical. Run it for 2-3 hours after each practice and annual costs total under $20.
Dehumidifiers draw more power – typically 300-400 watts. However, they only run when needed, and most modern units include humidity sensors that shut off automatically when targets are reached. Annual operating costs range from $50-100 in humid regions, still minimal compared to equipment replacement costs.
Moisture Control Hockey Storage: Preventing Mould and Mildew
Effective moisture control hockey storage goes beyond simply drying equipment. It requires understanding moisture’s behaviour and implementing strategies that prevent its accumulation in the first place.
The Moisture Problem in Canadian Climates
Canadian weather creates unique moisture challenges. Winter’s snow and ice melt on equipment, introducing liquid water beyond just sweat. This water has nowhere to go if equipment sits in bags or unventilated spaces.
Spring and fall bring high humidity to many Canadian regions. During these shoulder seasons, air can’t absorb much moisture from equipment because it’s already saturated. This is when mould problems typically begin if proper storage isn’t maintained.
Summer heat combined with humidity creates the worst conditions for bacteria and mould growth. Temperatures in unventilated Canadian garages can reach 35-40°C on sunny days, and if humidity remains high, you’ve created perfect conditions for microorganism growth.
Material-Specific Moisture Issues
Different equipment materials respond differently to moisture. Foam padding absorbs water readily and releases it slowly, meaning shoulder pads and chest protectors often remain damp longest. These items need maximum airflow and drying time.
Leather components like glove palms and skate liners require careful moisture management. Too wet, and leather moulds. Too dry, and it cracks. The ideal is complete drying followed by occasional conditioning with leather-safe products to maintain suppleness.
Plastic shells on equipment don’t absorb moisture but can trap it between layers. Ensure these items are positioned where air flows around all surfaces, not just exposed areas.
Mould Prevention Strategies
Inspect equipment monthly for any signs of mould – typically visible as black or green spots with a musty smell. Catching mould early makes removal simple (diluted vinegar spray works excellently). Advanced mould requires professional cleaning or equipment replacement.
Never bag equipment until completely dry. This is the single most important rule for mould prevention. If you must transport equipment before it’s fully dry (between same-day practices, for example), use mesh bags that allow continued airflow during transit.
Consider using silica gel packs or other desiccants in equipment bags during storage. These moisture absorbers cost just a few dollars and help control humidity levels inside bags. Replace or recharge them monthly for continued effectiveness.
Long-Term Storage Considerations
Off-season storage presents unique moisture challenges. Equipment stored in damp basements or humid spaces for 5-6 months will almost certainly develop mould and odours. Clean equipment thoroughly before storage, ensure it’s bone dry, and store in climate-controlled spaces if possible.
Some Canadian families use large plastic bins with desiccant packs for off-season storage. Drill ventilation holes in bin lids to prevent complete air sealing while still protecting from dust and pests. Check stored equipment monthly and air it out if any dampness develops.
Goalie equipment, with its massive foam padding, deserves extra attention during storage. Consider partially disassembling it to improve airflow around all components. Some goalies store leg pads standing upright rather than flat to prevent foam compression.
Goalie Equipment Storage: Specialized Solutions
Goaltenders face unique equipment storage challenges. The sheer volume and bulk of goalie gear exceeds standard hockey equipment storage rack capacity, requiring specialized approaches.
Understanding Goalie Equipment Challenges
A complete goalie set includes pads, chest protector, pants, gloves, blocker, catcher, helmet, and skates – easily 40-50 pounds of gear with massive physical dimensions. Standard player racks simply can’t accommodate this volume effectively.
Goalie pads present particular challenges. They’re heavily padded, absorb substantial moisture, and can’t be folded or compressed without damage. They require vertical or angled storage positions that maintain pad shape while allowing complete drainage and drying.
Dedicated Goalie Storage Systems
The Wet Gear Locker Sport Dryer excels for goalie equipment with its extra-wide base and enhanced weight capacity (220 lbs). The 36-inch width provides enough room for leg pads hung vertically, while multiple horizontal bars accommodate chest protectors and pants.
Some Canadian goalies use modified coat racks designed for winter jackets. The heavy-duty construction handles goalie equipment weight, and the height accommodates full leg pad length. Look for commercial-grade models at restaurant supply stores for best durability.
Custom Goalie Storage Solutions
Handy Canadian families often build custom goalie racks using 2×4 lumber and simple construction. A basic design uses a 6-foot vertical post with 2-foot horizontal arms at multiple heights. Total materials cost under $30, and construction takes about an hour.
Wall-mounted goalie storage saves floor space but requires careful installation into wall studs – the weight of wet goalie equipment can be substantial. Use lag bolts (minimum ¼-inch diameter) installed at least 2.5 inches into studs for adequate strength.
Drying Considerations for Goalie Gear
Goalie equipment requires significantly longer drying time than player gear due to thicker padding. Where player equipment might dry in 6-8 hours, goalie pads often need 12-24 hours for complete drying. This makes proper storage and airflow even more critical.
Position goalie equipment to maximize air access to all surfaces. Hanging leg pads vertically allows gravity to assist drainage while exposing maximum surface area to air. Place chest protectors with arms extended to open up armpit areas where moisture accumulates.
Some Canadian goalies use small personal fans aimed directly at their equipment during drying. This active airflow can cut drying time nearly in half, ensuring gear is ready for frequent practice schedules.
Blocker and Glove Care
Goalie gloves (blocker and catcher) accumulate massive amounts of sweat in the hand area. These areas often remain damp even when exterior surfaces feel dry. Always store gloves open and positioned where air can flow through the hand compartment.
Consider using glove dryers – devices that insert into gloves and blow warm air through the interior. These specialized tools ($30-50 at Canadian hockey shops) completely dry glove interiors in 1-2 hours, preventing the stubborn odours that develop in perpetually damp areas.
FAQ
❓ What is the best hockey equipment storage rack for Canadian garages?
❓ How long does it take for hockey equipment to dry on a storage rack in Canada?
❓ Can I use a hockey equipment storage rack for other sports gear in Canada?
❓ Do I need a heated drying system for hockey equipment in Canada?
❓ How do I prevent hockey equipment from smelling even with a drying rack?
Conclusion: Investing in Proper Hockey Equipment Storage
Choosing the right hockey equipment storage rack represents more than just buying a piece of garage furniture. It’s an investment in your family’s health, your equipment’s longevity, and your sanity during the hectic hockey season that defines Canadian winters.
The research is clear – properly dried and stored equipment lasts significantly longer than gear left crumpled in bags. When you consider that a complete set of youth equipment costs $500-800 and adult gear easily exceeds $1,500, a $100 rack that extends equipment life by even one season pays for itself many times over.
More importantly, the health implications of bacteria-laden equipment can’t be ignored. MRSA infections among hockey players are well-documented in Canada, and proper equipment drying represents your first line of defence. The inconvenience of a skin infection that sidelines your player for weeks far outweighs the minimal effort of proper storage habits.
For Canadian families navigating the intensity of competitive hockey or just enjoying recreational play, establishing good equipment storage habits early creates routines that last a lifetime. Kids who learn to hang their own gear properly develop responsibility and respect for their equipment that serves them well both on and off the ice.
Whether you choose a basic $50 rack or invest in a premium $300 heated system, the key is matching your solution to your specific needs. Consider your space constraints, number of players, practice frequency, climate, and budget. Every Canadian hockey family can find a storage solution that works for their unique situation.
The recommendations in this guide reflect real-world testing and feedback from Canadian families across our diverse country. From the humid maritimes to the dry prairies, from coastal B.C. to Ontario’s hockey heartland, proper equipment storage improves the hockey experience for players and families alike.
Take the time to set up your equipment storage properly. Your gear will dry faster, smell better, and last longer. Your garage will look more organized. Most importantly, your family will enjoy the game more when equipment management becomes a simple, automatic part of your hockey routine rather than a source of stress and unpleasant odours.
Here’s to many successful seasons ahead, with fresh, dry equipment ready for every practice and game!
Recommended for You
- Extension Cord Reel Wall Mount Garage: 7 Best for Canadian Winters 2026
- 7 Best Snow Shovel Holder Wall Mount Solutions in Canada 2026
- Best Snow Blower Storage Solutions Canada: 7 Top Picks (2026)
Disclaimer: This article contains affiliate links to Amazon.ca and other Canadian retailers. If you purchase products through these links, we may earn a small commission at no additional cost to you.
✨ Found this helpful? Share it with your friends! 💬🤗